Wednesday, May 5, 2010

Leif Charles is here!!


It has taken me a month to post this.....I've been a little busy.

Leif Charles was born on April 5, 2010 at 4:36pm.
He was 8 pounds 5 ounces and 20.5 inches long.

He was absolutely perfect at birth! Jeff and I are enjoying parenthood and having so much fun with our little boy!

Sunrise on the morning of Leif's birthday.
I took this picture shortly after checking into our hospital room.


After spending some time with us, he got his routine newborn tests.


One of our first pictures together.


Leif meeting his dad for the first time.


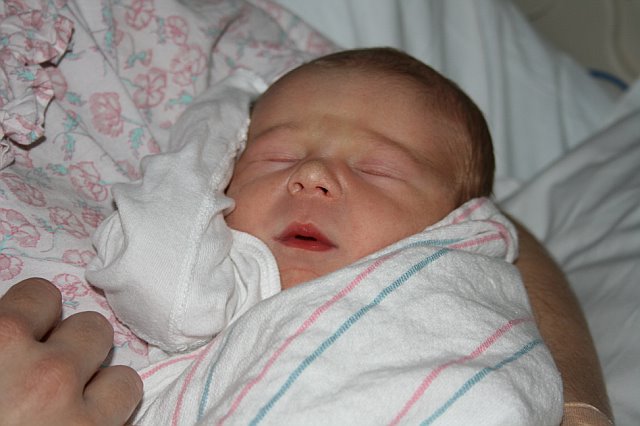
Sleeping after the excitement of being born.


Jeff got to stay at the hospital with us.


All dressed for the trip home. Wednesday April 7.


Big yawn!!


Just before checking out of the hospital and heading home!

Friday, March 26, 2010

Hoping to meet our Little Dude soon!!

With our due date in less than a week, I thought I should post some ultrasound pictures of our baby. We have been very busy preparing the house and getting ready for his arrival. I've been amazed at the amount of work that Jeff has been putting into our house...painting, carpeting, repairing, etc. (I'll post pictures of all of our baby related projects soon.)

These pictures were all taken on November 17, when I was 20 weeks pregnant.

The classic baby profile picture.

Here he is waving at us.

We got to see his feet too, but they didn't give us a copy of that picture. I thought his feet looked exactly like Jeff's hobbit feet. I guess we'll get to see them in person soon!

Sucking his thumb.

Here's my favorite. He's looking at us!

The whole ultrasound session was really cool! It was like an anatomy lesson. We got to see all four chambers of the heart pumping and saw both hemisphere's of the brain. The technician kept pointing out other organs too, but they were hard for me to tell what they were. They just looked like different blobs of grey. I'm looking forward to seeing what he looks like in the outside world. Just a few more days!!

Upcycling 1950's Curtains

This was one of the first projects Jeff and I wanted to tackle in our 1946 house. The living room and dining room had these 1950's style curtains that reminded me of my Granny. They were very high quality, well insulating and very meticulously maintained for decades. They even had the fancy theater style pull cord that makes them open and close. The problem is, they look like something a Granny would have in their house. We didn't want to get rid of them since they were still in really good shape and helped insulate our old windows, but we were on a mission to rid the house of the old lady style. These curtains just didn't really match with the feel we were going for in this house.


So, the solution was giving them a little make-over. I took them down and took all the shiny brass pieces and laid them out on newspaper.


I spray painted everything with a paint that mimics dark pewter. It also dries in a way that gives it a distressed aged look. The paint was designed for going over metal and had a high quality finish to it. It took about 3 coats of spray paint before the brass was covered. Then I rehung the rods and curtains.

Then I went to JoAnn's and found a remnant of some sheer sage green fabric in the clearance area. I just draped the fabric over the curtain rods to try to conceal the 1950's pleats in the curtains.


I thought this make-over brought the curtains into the new century. And the whole project cost less than $20!


Now we just need to do something about that recliner!

Wednesday, March 17, 2010

Felt Color Book

This is a project that I came up with for my sister-in-law's baby shower. I wanted to do something crafty that could be a gift for the baby. I made the cover ahead of time to give people an idea of what style the book would be.


I had blank tan pieces of felt to be the background for each page. The women at the shower teamed up and chose a color from the rainbow. Then I had lots of colors of felt to use for decorating the pages. I just had them glue the felt since I didn't want the craft to take too long at the baby shower.


One of the ladies was a retired elementary school teacher, so naturally she made a page that was educational. It's a counting page of leaves and berries. Everybody who contributed to the book signed the last page.


Later on at home, I worked on sewing the pages so they would be more durable. This was a bit time consuming, but the finished product was worth putting in the extra effort.


I whip stitched the pages together with multicolored embroidery floss. Then I bound everything together with a more heavy duty thread and the book was ready for the baby!

Wednesday, March 10, 2010

Maternity Photo Shoot

Over our Christmas break in Florida, my family organized a photo shoot for Jeff and me. Jason Angelini is a very talented photographer in the Tampa/St. Petersburg area. He photographed my sister, Rachel's wedding and did two photo shoots of my nephew Jax. I was excited to document this pregnancy and to have some nice professional pictures done of Jeff and me.

We spent the morning at Fort De Soto Park near St. Petersburg and took photos in three different locations. Fort De Soto is Jeff and my favorite beach in Florida because it is the most natural beach that we can find. It isn't crowded with hotels and tourists and you can just relax in a peaceful environment. These are just a sampling of the photos that Jason put on his blog. We have a DVD of the complete photo shoot and plan on framing some of our favorites soon.

Our first location was at the fort. Of course, we incorporated Jeff's resonator into some of the pictures.


We then headed to a grassy sand dune that was between the fort and the beach.

Just before this picture was taken, I was poked by a sand spur that was stuck to Jeff's back.


We finished off the morning at the beach. I think these might be my favorites from the day.


This is my "I am woman, hear me roar" shot.

We had a great time with our photo shoot and now have these pictures of this amazing time in our lives. I look forward to Jason photographing our little boy the next time we are in Florida!

Sunday, February 21, 2010

Baby Blankets

I have a little over a month before our baby is here! I have been organizing the house like crazy and getting rid of tons of stuff. So, I have many craft ideas in my head, but haven't had a lot of time to make any. I have a quilt that I need to finish; it just needs the back put on. So, hopefully I can get that done before the big day! While that is still in progress, I will post some baby blankets that I made in the past. These all were gifts for family and friends.

Here is an "Around-the-World" quilt that I made for Jeff's nephew, Jacob. We didn't know if he was going to be a boy or girl, so I thought yellow and green were very gender neutral colors. I tried to arrange the colors in a way that made sort of an optical illusion. If you squint at it, it looks almost like you are looking down on a pyramid.


There is a really easy shortcut to making this pattern, that I will blog about in the future. So, don't be fooled by all the little squares. I didn't cut those out and sew those individually. :)


This is a quick fleece blanket that I made for a friend. I didn't have the time to commit to an actual quilt, so I thought just a soft cozy blanket was good enough. This blanket only took one evening to make. It was just one piece of mint green fleece with ivory fleece appliqued on top.


Then I used silky ivory blanket edging to finish it off.


This duck taggy blanket was also really quick to make. It took me about 2 hours. There are two layers of duck fleece fabric with loops of yellow polka dot ribbon on the edges. My sister just blogged about some taggies that she has been making here. This taggy is only about the size of a hand towel and is supposed to be more of a toy than a blanket.


Anatomy in Clay

Last May I went to a workshop for Life Science/Biology teachers. I admit that the main reason I went was because it sounded artistic. (In 7th grade, students don't learn a lot of Anatomy, so I wouldn't be able to apply much from the class to my actual teaching.) So, my reasons were totally selfish and I got two days off from work for it. :)

Basically, there is a whole curriculum that is all about constructing an anatomical model of the human body using clay. So, I spent two days learning a bunch of clay construction techniques....as well as refreshing my memory on Anatomy. There was a plastic skeleton that all the muscles, veins, arteries, etc. were affixed to. Maybe if I end up teaching high school Anatomy and Physiology, I'll use what I learned in the class. Until then, it was fun playing with clay and making a cool man-with-no-skin! Here was the final product!


You can see some of his internal organs in this one.


I gave him a hat and some turquoise dreadlocks with my extra arteries, veins and lymphatic system.