Showing posts with label craft. Show all posts

Thursday, October 28, 2010

Cross Stitch Bib


I have been slowly working on this bib for the past few months. I mostly worked on it during Leif's naps. It was a very simple pattern with large stitches. Since the pattern was printed on the bib, I didn't have to do any counting. I finally finished it last week.

Leif has worn it a few times. He's only had bananas and applesauce, so it hasn't stained yet. The food that has gotten on it has been able to wash out. I sort of like the idea of looking back on this and seeing the stains and wear as sort of a scrapbook of Leif's childhood.

Monday, October 25, 2010

2010 Grand Ave. Boo Bash

Yesterday was the annual Boo Bash on Grand Ave. I was excited to participate in it this year and start a yearly tradition with Leif. Leif is still too young for most of the activities, like trick-or-treating, crafts and pony rides. So we stuck to the more baby friendly happenings.

We chose to enter Leif in the costume contest. (Jeff and I don't want to put too much of an emphasis on competition. But this contest had many winners and every kid got a festive bead necklace.) There were 10 winners in the 0-4 catagory (out of about 50 kids.) And one of them was this cute little garden gnome!!

Here we are waiting to hear how we did. The Mardi Gras beads were to identify the contestants. Leif enjoyed sucking on them.


The judges included mascots like the Timberwolves' wolf and the weird pink guy from the Saint Paul Saints.


There were some amazing costumes in the crowd, so I was surprised when we heard them say "The Gnome."


Leif's prize was a little monkey set including a monkey blanket, rattle and onesie. All of the prizes were donated by businesses along Grand Ave.


Leif wasted no time chewing on the monkey's tail.


We saw this hilarious costume in the older kids category. It's a kid dressed up as the Michael Jackson Thriller doll in its original packaging! I had to take a picture because I had that doll as a kid.


After the contest, Grace joined up with us and we meandered down the street to the hardware store where there was a petting zoo. Leif loved it!!


The animals included goats, alpacas, a baby yak and something called a zebu.


There was an amazing spice store that we went to next. Jeff bought a bunch of Indian spices, which I am looking forward to enjoying. We then ate some great wood fire pizza with Grace. Leif proceeded to spit up on his beard, which signaled that it was time to take the costume off. (Luckily, I made the beard out of washable fabric, so it will be ready for the real Halloween next week.) Leif then played with a balloon. Click to see the video: http://qik.com/video/16682782/leif-v-balloon

Leif was pretty worn out after his first Halloween festivities, so we went home for a nap. We are looking forward to more Halloween fun next weekend with Grandma and Grandad!!

Happy Halloween!!
Friday, October 22, 2010

Convertable Craft Corner

Living in a small 1 1/2 story house means that we have to be creative with our use of space. I have always wanted a craft room, rather than taking over the dining room every time I want to sew something. I also need a space to work on my Masters degree, which was also taking over the dining room table. But we don't have the space for a home office and a craft room for me.

Jeff spent last winter refinishing our attic to make a nice cozy space for a family room and home studio. But there was still an awkward little corner just to the side of the stairs. The ceiling is slanted so it is too short to stand up. And the floor space is too small for a couch or full sized desk. I have struggled with how to use this space in a workable way. So, during Leif's nap, I decided to take back some unused space and created a craft corner.


I put an old second hand sewing desk in the corner. (The old sewing machine that was inside did not work, so I removed it.) I found the chair in an alley a few blocks away and cleaned it up.


Then I mounted some little mantel shelves that I have had for 6 or 7 years. I have moved with these in a box twice but never put them on a wall. Finally, I found the perfect place for them. (They are also the perfect size for the little boxes Rachel gave me from Costa Rica which are holding office supplies like paper clips and rubber bands. The little Thai shoes were a gift for Leif from Laura and Corey. The photograph is my favorite picture of my Granny, Great Aunts Martha Jean and Joan when they were little girls.)


The desk is also the perfect size for my little old PowerBook. It is nice to have a more permanent place for the computer rather than dragging it all over the house.

And the third use for this little space is a sewing table. With just a few moves, the desk opens and I double my work space. (I am trying to figure out a way to put my sewing machine into the desk, so it flips out the way the old one did.)


There is also just enough space for a little helper.


(That's also a little sneak peek at Leif's Halloween costume. I'll post more pictures soon.)

Friday, March 26, 2010

Upcycling 1950's Curtains

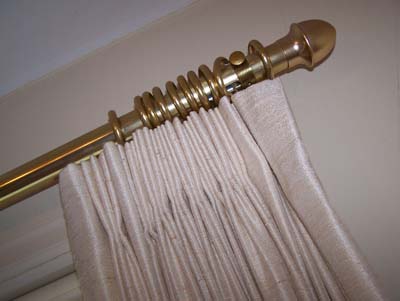
This was one of the first projects Jeff and I wanted to tackle in our 1946 house. The living room and dining room had these 1950's style curtains that reminded me of my Granny. They were very high quality, well insulating and very meticulously maintained for decades. They even had the fancy theater style pull cord that makes them open and close. The problem is, they look like something a Granny would have in their house. We didn't want to get rid of them since they were still in really good shape and helped insulate our old windows, but we were on a mission to rid the house of the old lady style. These curtains just didn't really match with the feel we were going for in this house.


So, the solution was giving them a little make-over. I took them down and took all the shiny brass pieces and laid them out on newspaper.


I spray painted everything with a paint that mimics dark pewter. It also dries in a way that gives it a distressed aged look. The paint was designed for going over metal and had a high quality finish to it. It took about 3 coats of spray paint before the brass was covered. Then I rehung the rods and curtains.

Then I went to JoAnn's and found a remnant of some sheer sage green fabric in the clearance area. I just draped the fabric over the curtain rods to try to conceal the 1950's pleats in the curtains.


I thought this make-over brought the curtains into the new century. And the whole project cost less than $20!


Now we just need to do something about that recliner!

Wednesday, March 17, 2010

Felt Color Book

This is a project that I came up with for my sister-in-law's baby shower. I wanted to do something crafty that could be a gift for the baby. I made the cover ahead of time to give people an idea of what style the book would be.


I had blank tan pieces of felt to be the background for each page. The women at the shower teamed up and chose a color from the rainbow. Then I had lots of colors of felt to use for decorating the pages. I just had them glue the felt since I didn't want the craft to take too long at the baby shower.


One of the ladies was a retired elementary school teacher, so naturally she made a page that was educational. It's a counting page of leaves and berries. Everybody who contributed to the book signed the last page.


Later on at home, I worked on sewing the pages so they would be more durable. This was a bit time consuming, but the finished product was worth putting in the extra effort.


I whip stitched the pages together with multicolored embroidery floss. Then I bound everything together with a more heavy duty thread and the book was ready for the baby!

Sunday, February 21, 2010

Baby Blankets

I have a little over a month before our baby is here! I have been organizing the house like crazy and getting rid of tons of stuff. So, I have many craft ideas in my head, but haven't had a lot of time to make any. I have a quilt that I need to finish; it just needs the back put on. So, hopefully I can get that done before the big day! While that is still in progress, I will post some baby blankets that I made in the past. These all were gifts for family and friends.

Here is an "Around-the-World" quilt that I made for Jeff's nephew, Jacob. We didn't know if he was going to be a boy or girl, so I thought yellow and green were very gender neutral colors. I tried to arrange the colors in a way that made sort of an optical illusion. If you squint at it, it looks almost like you are looking down on a pyramid.


There is a really easy shortcut to making this pattern, that I will blog about in the future. So, don't be fooled by all the little squares. I didn't cut those out and sew those individually. :)


This is a quick fleece blanket that I made for a friend. I didn't have the time to commit to an actual quilt, so I thought just a soft cozy blanket was good enough. This blanket only took one evening to make. It was just one piece of mint green fleece with ivory fleece appliqued on top.


Then I used silky ivory blanket edging to finish it off.


This duck taggy blanket was also really quick to make. It took me about 2 hours. There are two layers of duck fleece fabric with loops of yellow polka dot ribbon on the edges. My sister just blogged about some taggies that she has been making here. This taggy is only about the size of a hand towel and is supposed to be more of a toy than a blanket.


Anatomy in Clay

Last May I went to a workshop for Life Science/Biology teachers. I admit that the main reason I went was because it sounded artistic. (In 7th grade, students don't learn a lot of Anatomy, so I wouldn't be able to apply much from the class to my actual teaching.) So, my reasons were totally selfish and I got two days off from work for it. :)

Basically, there is a whole curriculum that is all about constructing an anatomical model of the human body using clay. So, I spent two days learning a bunch of clay construction techniques....as well as refreshing my memory on Anatomy. There was a plastic skeleton that all the muscles, veins, arteries, etc. were affixed to. Maybe if I end up teaching high school Anatomy and Physiology, I'll use what I learned in the class. Until then, it was fun playing with clay and making a cool man-with-no-skin! Here was the final product!


You can see some of his internal organs in this one.


I gave him a hat and some turquoise dreadlocks with my extra arteries, veins and lymphatic system.


Saturday, January 23, 2010

Used Book Wall Art for Baby's Room

We are in the midst of converting our second bedroom into a baby room. Most of the major work is being done by Jeff, so I've been focusing more on the decorating side of things. I have been trying to find decor that can grow with our boy. We didn't want anything too babyish, so I am always looking at things through a four-year-old's eyes. After considering several decor themes (music, jungle, etc.), we decided on woodland animals. I liked the idea of decorating with creatures we see in Minnesota.

At a used book store in St. Paul, I found the perfect wall art that matched our theme. I found this classic Little Golden Book for 50 cents.


There are several stories in the book that are all about going to bed. I loved the illustrations of all the sleepy animals! So, I got some pliers and pried open the binding.


I then cut out my two favorite illustrated pages.


I picked out two 8 x 10 frames at Menards for $2 each. Since the pictures were not standard photo size, I went to Michael's and got some custom mats cut. This was the most costly part of the project; about $12 total. Here's the finished product!


I love the way these turned out! I especially love the raccoon in his hammock! The pictures are currently sitting on the dresser waiting to find a home on the wall. I haven't committed to which wall I will hang them, so I'll post an update of their final location once I have decided.

Friday, February 20, 2009

Gnome Baby Washcloth


This Waldorf inspired baby toy was a gift for my nephew. It is made from an old towel and some left-over fleece fabric from a previous project. I saw a posting on craftster that I used as a guide to make this toy. They have a really nice tutorial that is easy to follow. I finished this project in just a couple of hours.

This is a very simple toy that can be used for many different things: washcloth, snuggling during a nap, chew on it for teething, etc.

Tuesday, January 13, 2009

Funky Lamp Out of Reused Materials

This is a project I did several years ago. I found these old pictures on my hard drive and thought I'd share this idea.

Ingredients:
  • One strand of Christmas lights
  • One wire hoop (the kind used for making a wreath)
  • An old curtain.
I had these funky old curtains from my college apartment that were really beat up. They had some cool bead work on them, so I didn't want to get rid of them. So, I thought of re-purposing them to make some funky hanging lamps.

Basically, I cut the curtain to the length that I wanted the lamp. I sewed the two long sides of the curtain together to make a tube. Then I sewed a hem on the top and threaded a string through it. Then I placed the curtain around the hoop and cinched it, to keep it from falling off the hoop.

Then I strung the Christmas lights through the hoop so they hung the length of the curtain.

Here is what the final product looks like:

Since there were two curtains to begin with, I ended up making a matching pair of lamps. I currently don't have these hanging up in my house, now that I have moved. I just can't think of a place that they will look right. Suggestions welcome!